March 28, 2013

Starting a garden, Part 1

Here we go...lets start a garden. Im going to give you some great advise on how to build a garden 

1st Step: Location, Location

Choosing the  right location will ensure the plants are getting the proper amount of sunshine. Just go outside and observe at different times of the day to see what area gets full sun. Also, there is a handy app that you can use called Sun-Seeker Lite.  This will help you determine where the sun is at certain times of the day. 
Just remember, you will need at least 6 hours of full sun!


2nd Step: The Zone

Determine what planting zone you are in. Dont worry, I'll explain how to do this. The zone information will {for the most part} tell you when it is safe to plant certain crops.  It gives you a good starting point. The zone is based on the projected last frost date in the spring and first frost date in the fall. For example, where we are in the  piedmont of North Carolina (zone 8), the date indicates that the last frost date will be April 15th. However, Im not too sure about this since it has been quite cold. I will consult my almanac and see how the weather forecast is for that week before I put the plants out. I discovered this site recently and it is very helpful plus it's free ~ Smart Gardner. 
You can actually type in your zip code and it will tell you what zone you are in and what you should plant at certain times. And it can help you plan out your garden too. Its super helpful!

3rd Step: Plan

What would you like to eat this summer? Grab a piece of paper and make a list of what kind of crops you will plant. The Smart Gardner will also help you determine what you can grow where you live. I will be planting carrots, beets, spinach, peas, beans, broccoli, cauliflower, tomatoes, cucumbers, squash, zucchini, watermelon, cantaloupe, corn, zinnias, snapdragons, marigolds, bachelors button, sunflowers, asters, stevia leaf, parsley, and cilantro....I  may add more, but not sure.


4th step: 

Figure out what size raised bed(s) you wish to have. This will be based on the space you have available or space you wish to dedicate.  And just think, if you enjoy growing your own food, you can expand in the fall or next spring. The 6 beds we, I mean my husband made are 4' x 12'. We chose 12' because boards come 12' long and that way there was less cutting. Each bed took him about 30 mins to build--amazing! He used pressure treated wood, which is very durable, but Im not too crazy about the chemicals that could leach into the soil, so Im in the process of lining each bed with black plastic {contractor trash bags}.

Try to use what you have for building the bed(s). Do you have a pile of lumber, bricks, huge rocks, stone, or cinder blocks laying around? Get creative.  Dont use railroad ties...they have been treated with creosote, which is very toxic. Cedar or redwood is best type of wood because it naturally resists rot and insects. If you use wood, here are some helpful instructions on building a raised bed. Everyone learns differently, so if these instructions are a bit confusing, do a search for " how to build raised beds."
This is from a book I have Great Garden Companions
 
Instructions continued
Here are the new 6 raised beds
A close up


Filling the beds with a mixture of clay, compost, sand and bark

my sweet helper

I'm lining the bed with the black plastic contractor trash bag. I used roofing nails to tack it to the wood. I used what was available in my husband's garage...no need to go buy more supplies...just use what you have
1 bed lined, 5 to go. And yes, I do all of this while my honey bear is right with me. She was giving me nails when I needed them, but then found a rock and started to toss it in the water-filled wheel barrel.

I'll let you digest all of this information and we'll pick back up where we left off on my next post. I'll go over selecting seeds or plants, growing medium {dirt}, and planting.  No sense in overwhelming you.


Here's what we've been doing this week....

Me and my little helper worked on the milk jug greenhouses. This allows us to get ahead on starting the seeds even though it is still too cold to plant seed directly in the ground. It seems like a brillant idea. I found the winter sowing idea here. I started the seeds on March 21st. Then planted more seed on March 25th and 27th.

Getting supplies together
Here I go..

I began poking drainage hole in the milk jug
I did it the old fashioned way because I couldnt find any of the 7 drills my husband owns. So I proceeded to heat a screw driver to make the drainage holes.


Cut the milk jug and left a little hinge

Honey bear , in her minnie mouse attire, filling the jugs with 2-3 inches of potting mix
Planting the seeds


labelled, taped closed and outside in the southern sun


Do you have any questions so far? I love comments, so feel free to say something in the comment box.

March 25, 2013

Spring is Here

It was a rainy and cold weekend here, so I didn't do much in the garden. Which is alright because the almanac says " march 23-26, a barren period.

I did, however, make more milk jug greenhouses and have a few project wounds--a couple of burns and I got bit by the drill bit Still working on that post, though. 

I'm so excited about re-vamping the garden and preparing for the growing season. I'll leave you with some images that inspire me.... in reality, some are do-able and then some are just eye candy for now. 
     source: house& home, may 2010
source

I will be trying this system of companion and beneficial planting.  Along with some tepee forms for the tomato plants    source

I would love to get some sort of beans and or peas running on this type of trellis. To give the garden some character.   source 

I will be busy in the garden this week. The weather forecast looks good. Here are some previews of what I will be posting this week.

never thought i'd be digging for earthworms

ripping up ground cover


broccoli & cauliflower

planting seeds


Compost pile

dancing in the wind

raised beds are built....thank you Stevie


March 21, 2013

Its a Learning Process

I think it is important when approaching something for the first time, one must understand three things:
  • where you've been
  • where you are
  • where you are going

I want to explain a little about "where I've been." My hope is that I will inspire you to begin a garden yourself, not discourage because of my experiences. I am merely just taking you on a path of which I have traveled.

One thing I recommend when having a garden is to have a notebook/journal and write down the things that work well for you, things that bother you and possible solutions to your problems. This is a summary of my notebook:

the very first year

first year: the plants are actually growing


Needed to learn how to prune...so plant can concentrate its energy into growing the fruit instead of more leaves
Needed to train tomatoes earlier & was behind on my weeding

iPhone capture of 1st cucumber harvest....was so excited


Lesson learned : clip off the dead leaves and not just let them be

End of the summer 2011: tomatoes are almost done..too many to pick. Weeds are out of hand. Kind of looks like a wild vegetable jungle. And tomato plant needs a better cage. It doesn't have any more support when it reaches the top of the cage.


yes...we had a goat. one word...MISTAKE

cantaloupe growing


2009:  Don't plant too close together, I hate weeds, plant less
2010: Not letting my husband talk me into having a huge garden, learn to prune tomatoes
2011: Learned to embrace the large garden, train tomatoes early on cages, plant less so we don't waste food.
2012: I cannot deal with weeds anymore. Till less? Have to find a solution that doesn't involve a lot of work or chemicals. Find an alternative to tomato cages. Train tomatoes early. Don't use Sevin.


2012, the year that inspired change


I was excited about having another garden, but things didn't go as planned.....Since we had such a mild 2012 winter. I had bugs out the wazoo. Yes, I just used the word, 'wazoo' it comes from the animated film...Over The Hedge, sorry, it was just fresh in my mind.

  •  First the cucumber/squash beetle wiped out my cucumbers. I absolutely love cucumbers. I was just sick.....all the work that had gone into prepping the land, planting....and with just a few nibbles by the cucumber/squash beetle, the plants were infected with bacteria which then gradually over the course of 1 week turned into bacterial wilt...something no gardener, especially a cucumber lovin' gardener wants.
See my last cucumber plant near the tools...shriveled up....a sad day
  • Then the squash & zucchini started to shrivel up and die...also due to this same insect. 
ripping up the plants....in the big trash bag & continual battle with weeds
  • In educating myself about this bug and what I could do to prevent, I actually learned something. DON'T USE SEVIN. Regardless of how many people that tell you they swear by it...DON'T use it! Any product that starts out by saying: It kills "over 100 insects..." is BAD!  If one eradicates all bugs from the garden, there's nothing to keep the bad bugs in check. Its basic food chain science. And these creatures aren't affected by Sevin, so it allows them to proliferate like crazy because their predator(s) have been killed. I will explain how not using pesticide is actually more beneficial....a bit later.

  • The tomato plants grew so tall. I had to start researching new ideas for support. Tomato cages don't work for me.  Im thinking about doing tepees out of 7 and 8 foot bamboo. Do you have any ideas?
lets see...we've got tomato cages, bamboo, twine and some t-posts...and the tomatoes are still leaning.  And oh, more ugly weeds.

  • We had a lot of rain, and the weeds continued to multiply. I spent more hours pulling weeds than tending to the plants and harvesting. You can see from just about each of my pictures...my problem with weeds. No more illustration needed!

  • This was my first time planting spring plants. Spinach, Onion, Beets and Peas. It was pretty successful, just need to sow (plant ) earlier.  It got hot quickly and these plants don't do well in the kind of heat we had.
    onions were delicious...plant more
    learned:  do spinach a bit different this year because the weeds crowded them out
    the peas were very delicious....so much more than the grocery store offers


this was about as big as the pea plant got...learned: plant earlier so it can have cooler weather. In fact, i planted some pea seed today...a post on that later.
     
  • My melon issues:  Funny story~ As the watermelon and cantaloupe are getting ready to pick...i lean down to pick a sweet smelling cantaloupe and low and behold, a hole with seeds oozing out as I pick it up. I'm left with goo & rotten juice on my glove, which also leaks through my glove...ughh. And this only means 1 thing: Rat. Mouse, Vol. Whatever you want to call them. The rats ended up taking over my melon patch and I was so mad! Never found a way around this problem. Any ideas from anyone?
     

When you have a rough gardening season, it causes you to re-evaluate methods and change what you do. So I'm currently in the process of re-vamping the garden this year. And hopefully can walk you through the process.


My goals for the garden this year:

  • Have a spring garden
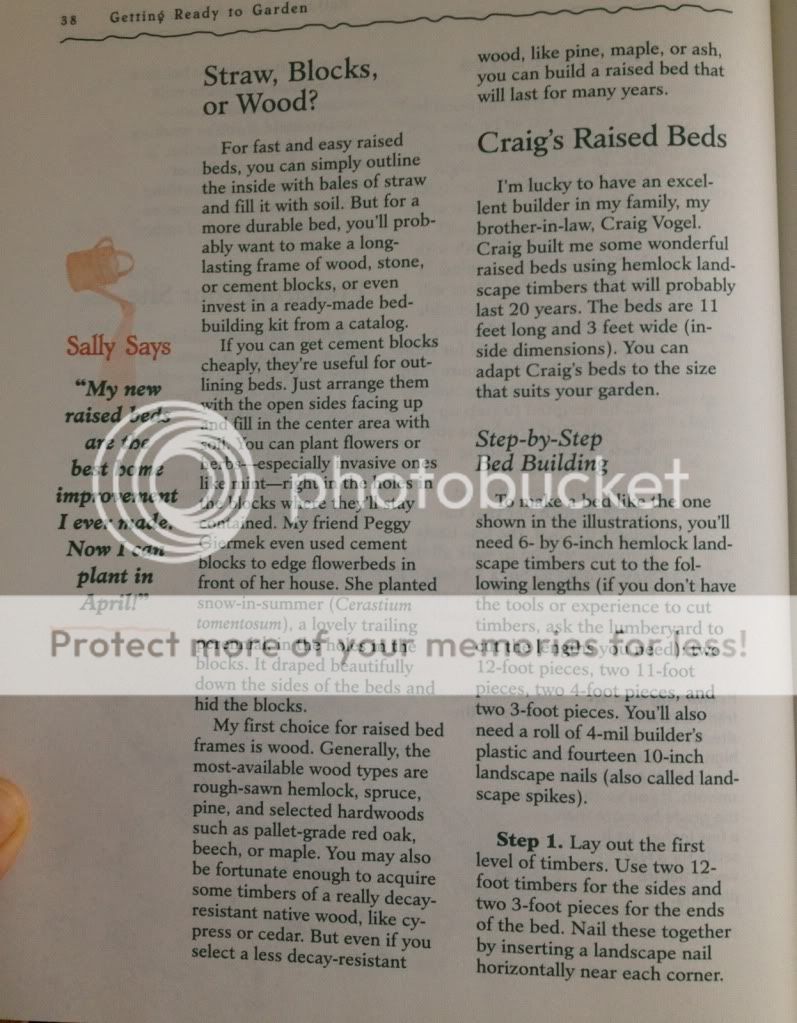
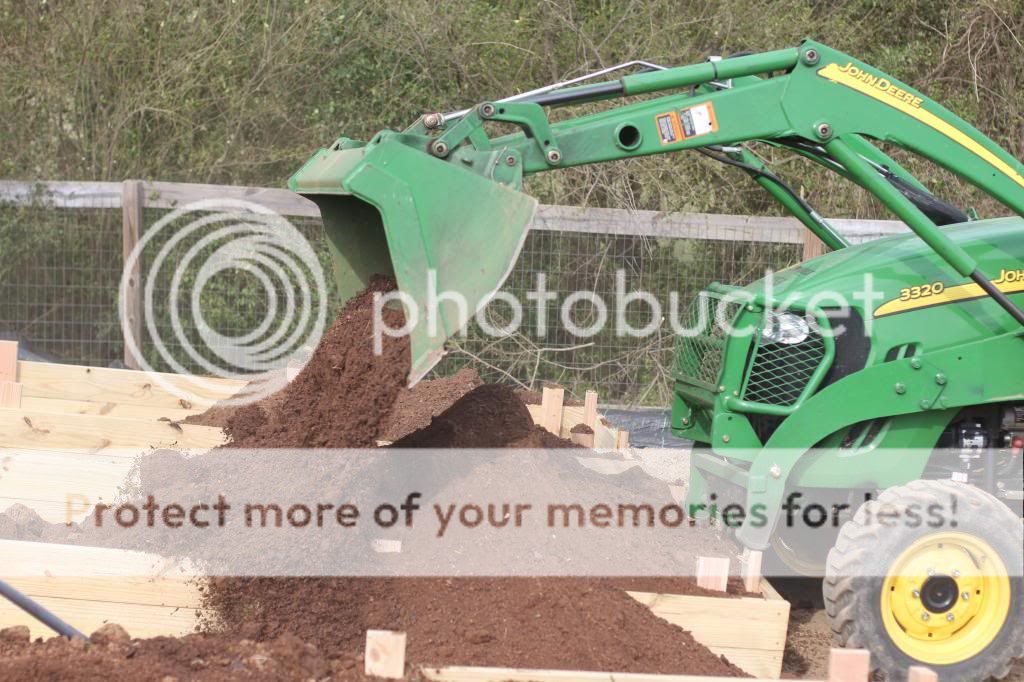
  • Find a solution for weeds...raised beds !
  • No chemicals
  • Try to be organic
  • Start a compost pile
  • Solve mouse problem
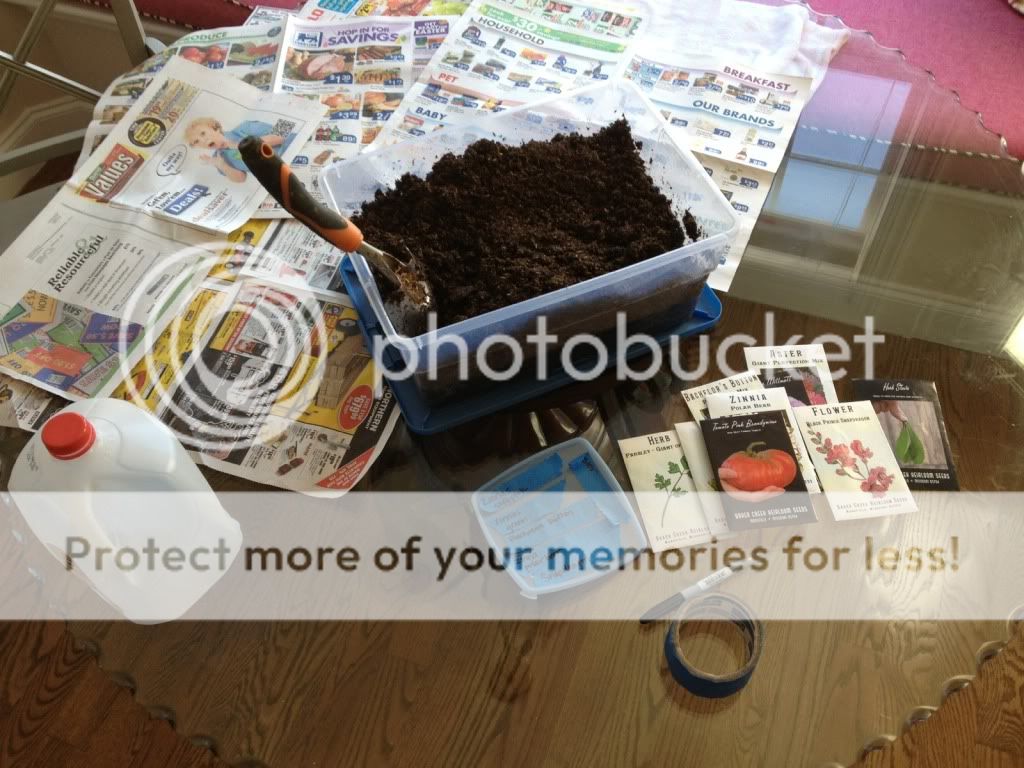
  • Try something new: plant from seed
  • Use tomato cages for cucumbers
  • Use Bamboo to make tepees for tomato plants

Enough about the past. The difficulties proved to be a great learning tool. I just wanted you to know why I will do things very different this year in the garden. I'm moving forward and so excited! 

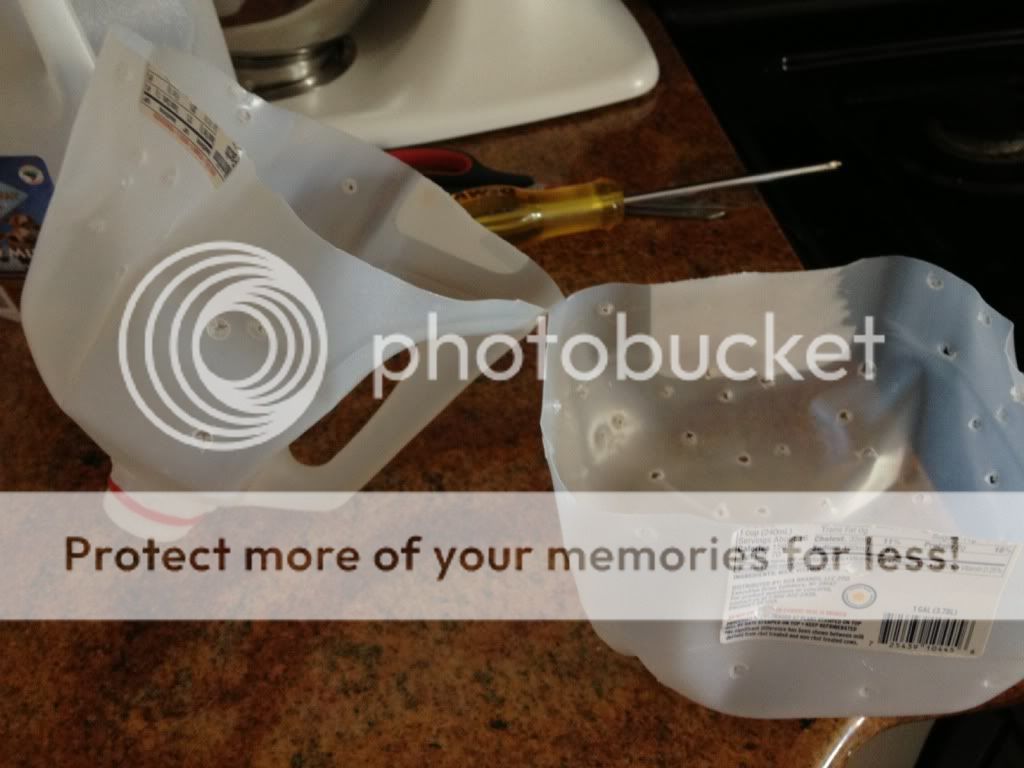
 Stay tuned... I have more posts coming about the new additions to the garden. Can't wait to show you the new raised beds, compost pile, milk jug greenhouses, the brocolli & cauliflower in the ground growing and much more.


window.setTimeout(function() { document.body.className = document.body.className.replace('loading', ''); }, 10);